How cute are these IG-inspired Valentines Day Cards I whipped up for the little’s school party?!

So, so cute, RIGHT?! And, I’m sharing the FREE download, too!

How cute are these IG-inspired Valentines Day Cards I whipped up for the little’s school party?!
So, so cute, RIGHT?! And, I’m sharing the FREE download, too!

Every few years, the Mr. agrees to a Halloween costume that requires me to paint him. He complains every time, during the process, but seems to beam with pride when we walk into the party and folks dig all of the effort ‘we’ put into our outfits. Funny how that works, right…
Now, we’ve fallen off of the outlandish adult costume wagon the last two years, and let our little guy be our focus on All Hallows Eve, but we are still ‘those’ parents that coordinate with our kid during Trick-Or-Treat. And I think he really enjoys us participating with him!


Anyways, by the time Fall came around this year, my itch to get back into the spirit was driving me bananas! I’ve binge watched countless episodes of Face Off (on SyFy) and one character has always stuck out amongst all 10 seasons. On Episode 8 of Season 2, Matt Valentine created a Burton-esque Ice Cream Man and it was AMAZING!
I’ve been carrying this costume idea in my back pocket for years now!

The clothing was easy to come by and simple to alter to mimic Matt’s creation. I just ordered white painter’s pants, a white button down from Amazon. With some brown puffy paint (ahhh brings me back to my childhood!), brown fabric spray paint, real rainbow jimmies, and round sprinkles, I covered both outfits and did some additional distressing by burning the edges of his sleeves and ripped knee area. For the red and white striped shirt, I simply purchased an additional pair of tights from Party City and cut the legs off at the top so he could slide one up each arm. I used a bit of left over for the knee patch.
For all 4 of the ice cream cones, I used tan foam sheets from Hobby Lobby and squeezed on acrylic (paintable) caulking, from the hardware store, into a grid pattern. Once dry, I spray painted the whole thing in a tan color, then went back and stippled on a darker brown craft paint and wiped off to create the shadowing on the cone ridges. Rolling them into the cone shapes was the most daunting portion of this costume, I swear LOL.
All of the ‘chocolate’ is the dark brown puffy paint, which worked well to ‘glue’ the shoulder cones in place, too.

I purchased some No-Smudge white face paint from Halloween Express (thinking that it would be better than the white paint I’ve used in the past that smeared if you just looked at it). Man, this stuff was terrible! I applied it with a makeup brush and I struggled to blend it from the very beginning. Then, as soon as it dried- like 2 seconds later- it began to crack with every facial expression he made. Grrrr. My hopes for his makeup were WAY higher than what I ended up achieving, thanks to the crap white paint. The only product that would adhere to it was my Ulta brand bronze gel eyeliner pot, so all of the shading I had in mind went up in smoke.
Moving on… lol
Since there isn’t a ‘female’ version of this costume, I just created a similar look for myself.

I struggled to find a vintage Ice Cream Parlor/Waitress/Soda Jerk dress online like I had in my mind, so I ended up improvising with this modest nurse’s costume, also from Amazon. I ditched the hat, pulled off the red felt hospital patches from the sleeves, and swapped out the cheap apron that came with it for a real waitress style with ruffled edges.
I attached my cone to a basic headband with hot glue and secured it with a few hairpins since it wobbled a bit. And yes, those are real sprinkles on our faces. I attached them with eyelash glue and they held all night through lots of laughing, eating and drinking!
I’d say it’ll be a few years until I can convince him to go this made up again, so I’ll enjoy this one for awhile (and the random sprinkles that I’m still finding around the house will help with that)!
PS- We won the Costume Contest at the party we attended! Yay Team!


Ok, so I’m apparently on a tree-base-making-binge… just roll with me- K?!
After finishing the urn base for our living room tree, and LOVING it! I decided to crank it up a notch and create one for the Duke tree we surprised hubby’s Uncle with. This one was so much fun to make!
I purchased an outdoor planter from atHome for $59- EEK! (Lesson learned- plan ahead and get them while they’re on sale in the Fall).

After wiping it down, I covered it in 2 good coats of white primer, followed by 3 coats of white satin spray paint (I always apply way more layers than I probably need to, but I like a rich finish).

My original plan was to mask off the interior boxes, that I wanted to leave white, while I spray painted the remaining surface royal blue. However, I found that I was just too impatient for all of that. So, I ended up painting the whole thing metallic blue and improvised from there. Rustoleum’s Metallic paint collection leaves a gorgeous finish in person!!
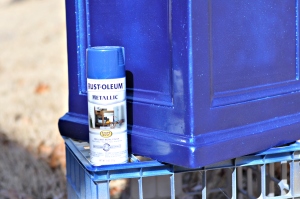
I, instead, masked off the blue area later with wax paper and painter’s tape and sprayed the interior boxes white.

Once everything dried overnight, I applied the decals that I found at a local sports memorabilia store.

I finished it off by outlining the edges of the planter with a silver metallic Sharpie and filled them in with matching acrylic paint.

What sports team would you deck your tree out in?!


So we have a very special someone that is a diehard Duke fan. He does so much for all of his family and friends everyday, we thought we would, in turn, do something special for him.
We snuck- (I just like it so much better than sneeked!) **tomAYto/tomaato** into his office this week and set up a tree- all decked out in blue, white and silver. Go Blue Devils!
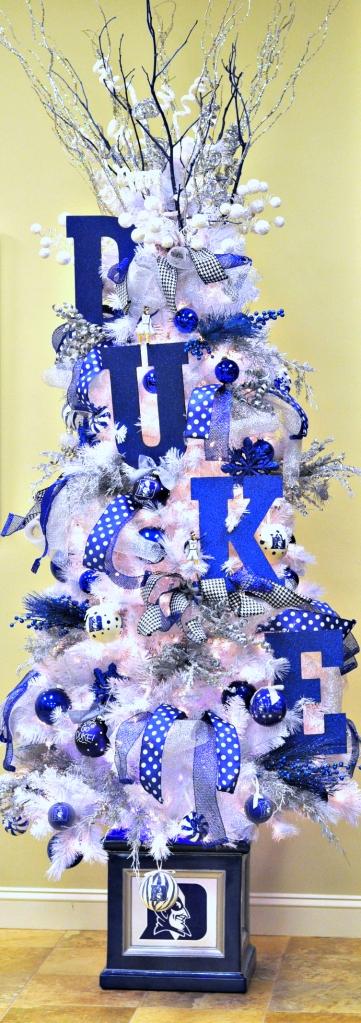
I created the base by painting an outdoor planter and adding Duke logos to each side- see my quick tutorial on that here.
I made the D-U-K-E letters from basic premade Chipboard and covered them in blue glittered cardstock- both from Hobby Lobby.


I chose four different ribbon styles- all wire edged for easy manipulation.


White Prelit Tree: HobbyLobby
Tree Base: DIY (see tutorial here)
All Ribbon, ChipBoard DIY “DUKE” Letters + Solid Ornaments: HobbyLobby
DUKE Trademarked Ornaments: St. Nick Nacks at Callahan’s of Calabash- Calabash, SC
Tree Topper Picks: HobbyLobby and atHome
Branches: My backyard 🙂 Spraypainted to match

 To further the remix of our old, tired Christmas tree, and because I had to adjust its height anyways, I decided to dress up the base.
I love the look of trees with alternative bases such as urns and pots! I’ve pinned several inspo photos over the years and referenced them in this project.

via Nell Hill’s

via The Yellow CapeCod
Since our new ceilings are a full 2 feet shorter that in our last home (that’s a whole other topic I’ll touch on later), I either had to shorten our existing 9ft tree… or buy a new one. Obviously, from my DIY Flocking post earlier, ya’ll know I chose the first option. I asked the hubby to cut the 9 foot tree down to 7 1/2. It was a fairly easy fix with just the simple purchase of a metal saw blade. It took him no time to cut through the hollow metal rod that runs up the center of the tree!
Then, I grabbed an outdoor urn that I already had (just sitting in our garage begging to be used for something, anything!), and spray-painted it a beautiful brushed nickel. I followed up later with a topcoat of white pearl- both by Rustoleum and purchased from Lowes.

I purchased a run of PVC pipe and I For the bottom and a 50 pound bag of Quick Crete. I lined the bottom of the urn with plastic, placed the PVC in the middle and poured the Quick Crete around it (keeping the pipe leveled and centered the whole time). The 50 pounds of concrete will aid in creating a sturdy base for the tree and to give us a channel to slide the interior tree rod into for stability.

I allowed the concrete to dry and set up for several hours- just to be on the safe side- then I brought it inside and positioned it in our room. I sat the tree rod into the PVC and started adding the branches.

*If your tree will be sitting on carpet like ours does, you may need to use shims to level it. Because the front of my tree is always heavier than the back, mine leans forward a bit. I just placed 3 shims under the front edge of the base and it did the trick!
As a tip- for unlit trees- I find it easier to add lights in small sections. I start at the bottom of the tree and insert two rows of branches at a time. I wrap two different types of bulbs around each branch and work my way up- two rows at a time. (I use larger bulbs on the interior portion and smaller, LED mini lights along the outside of the branches for added dimension).
Viola! The easiest concrete project I’ve tackled so far! What unique alternative tree bases are you planning for your holiday display this year?

I have always loved the look of a snowy white flocked tree!
I’ve been fighting back the urge to replace our 9 foot, basic, Fraser fir with a beautiful flocked Alpine for the last few years- the huge investment just always got in the way.

a truly terrible photo (but the only one I could dig up) of how dark and basic the tree was originally (circa 2010-ish)
With this being the first year in our new home, I had to make a decision because our ceilings in this house are 3 feet shorter than our last. So, I had to decide if I was going to make the investment, or work with what I had.
*Side note: Because of a side project I’m working on this year that required me to purchase a new tree and a full load of decor, I decided to wait until next year to invest in my own dream tree.
The more I scrolled through Pinterest and Instagram, the more I was dying for that beautiful white tree!
This is where the craftiness begins. I decided to ask the hubby to shorten the 9 foot tree down to 7 1/2. It was a fairly easy fix with just the simple purchase of a metal saw blade. Took him no time! Read about that process here!
To update the overall look of the tree, I applied Snow White glittered flock to every branch as well as the center rod. I searched high and low for professional grade flocking and found, by far, the best deal (and free shipping!!) from a retailer on eBay (Aquatic Reflection). I chose the 5lb bag and I had just enough to give the 7 1/2 foot tree a heavy coating.
 I started by covering my work space with a plastic drop cloth- our garage was the best area to work in. I laid out all of the branches, right side up. I worked on 3 or 4 branches at a time. With a basic water bottle, I misted the areas I wanted to be flocked. Immediately after, I sprinkled a handful of flock over the misted area.

I continued this process until I liked the heaviness (um, yeah…) of the flock. I went over each branch appx twice. Then, because I wanted a ‘whiter’ tree, I flipped the branches over (once they were dry) and flocked the underneath edges of each.

For appx $50, I upcycled a 7 year old basic tree into an updated, snow covered beauty! Compared to the $600-900 trees that I’ve been drooling over online, I’d say I came pretty close… and saved a car payment in the process!

Stay tuned for the real fun… Decorating!

It was December 1st and I didn’t have a single Christmas decor item even pulled from the attic yet. In year’s past, our house would be frosted from head to toe in silver and white sparkling glory by well before now. This year… not so much. I unrealistically thought that I would be creating this dreamy winter wonderland for my little nugget’s first Christmas- making it a truly amazing experience (ok, more for me than him at this point, but whatever). In reality, all I’ve had time to do is take care of baby, hubby and every few days, do something to myself!
Honestly, I cringe at the thought of dragging our 9ft (non pre-lit, by the way) monster out of the attic this year, along with the 300+ ornaments and decorations. But how could I not have a tree for baby’s first?! What a tragedy that would be! On the other hand… when I think of decorating a mini 4.5ft fur for our main man, I found myself giddy with excitement. Four + a half feet… I can surely manage that!
After talking it over with the little Mr., we collectively decided that in order to do this right, his first tree must match his room. And by match, I mean match perfectly! Pantone perfectly! Oh, and he insisted on using his initial for an overall theme. He’s always full of great ideas 😉
So, off to Hobby Lobby + Michaels I go- on Black Friday of all days! EEK- what was I thinking?!?
His room is various shades of gray (ha!), navy blue and creamy white. However, I found that the task of tracking down ornaments in navy or gray is nearly impossible. Figures! Ok, on to Plan B…

Pantone colors from his nursery
Since I was forced to make my own bulbs, I took off for the paint aisle. (I remember seeing a tutorial on Pinterest a few years ago- looked simple enough.) I grabbed coordinating acrylic paints, clear bulbs and matching bakers twine to use as hangers- instead of those ho-hum metal hooks. Tutorial coming up…

Clear Bulbs + Paint – Michaels
I also found some cute, flat bulbs that I filled with leftover bakers twine and adorable ‘C’ ribbon!

Bakers Twine filled flat ornament- both from Hobby Lobby

Craft paper cutouts – Hobby Lobby
Picking up some coordinating cardstock in silvers, grays, navys and patterns made for an easy DIY garland.

Cardstock + Bakers Twine – Hobby Lobby
2 1/2in Punch – Michaels
I created simple chipboard letters with leftover cardstock and hung direclty on the branches.

We carried the initial theme throughout the tree so naturally it needed a big ‘C’ to top it off right!

Paper Mache Letter – Hobby Lobby
Buttons – JoAnn Fabric
To finish it the whole thing off, I used a galvanized bucket instead of a tree skirt. The metal matches several of the finishings throughout the nursery and I think it adds a touch of industrial pizazz!

awelldressedlife

What nontraditional tree themes have you come up with?!

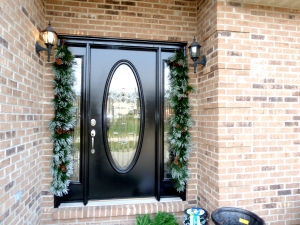
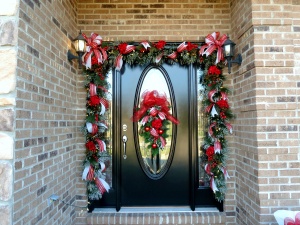
When decorating for the holidays, I don’t just stop at a wreath- I like to go beyond the center of the door and show my entire entry way some love! By defining your entry way with garland and lights, you can maximize the wow factor and create an inviting welcome for holiday guests. In years past, I’ve coordinated my exterior decor to match my interior seasonal theme. However, I have found that my monochromatic whites and silvers just don’t give me the pop of interest that I was looking for from the curb. I decided to step out and go with a brighter color scheme- adding bright traditional reds while still carrying over the glistening silvers for a tough of glamour.

awelldressedlife
My favorite exterior decorating project has to be the custom door garland I made last year. It really highlights the entry from the street and lights up the stoop with a beautiful holiday glow! Keep reading for my how-to on this great Christmas garland project!
What you’ll need:
Start by screwing the hooks into your door frame- one in each corner and two to three in between should suffice. (I painted my hooks to match my door casing so they aren’t easily seen even after the holiday decor is removed)
If I had to do it over, I would connect my three runs together- end to end- while they are laying on the floor. This would have to be easier than trying to connect them while standing on a ladder- as I did last year. Then I followed by wrapping the lights around the branches. Make sure you have them lit up while you work so you avoid leaving any dark areas in the garland!
awelldressedlife
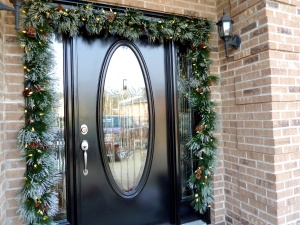
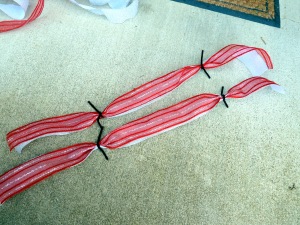
Take your ribbon and cut in 2ft sections. Stack two strips together and using the pipe cleaners, gather both strips of ribbon and tie at each end.
awelldressedlife
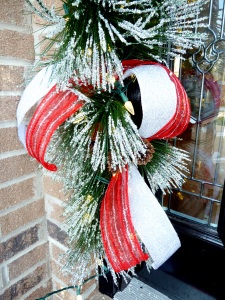
Twist the pipe cleaners around the garland branches and fluff the ribbon to create the illusion of intertwining bows. Don’t forget to finish off your ends by cutting at an angle or into a V.
awelldressedlife
Add your floral picks or ornaments to fill in gaps throughout the garland. Make two large bows and attach in each corner to complete! Enjoy!
awelldressedlife


Finding light, love and hope for the little things and inspiration for the big
"A torn jacket is soon mended, but hard words bruise the heart of a child." Henry Wadsworth Longfellow
be happy with what you have, while working for what you want
Carrie McClanahan, WV, Integrated Marketing
